E19 | Westford Historic Renovation | Heavy Metal
Season 46 Episode 19 | 23m 42sVideo has Closed Captions
Fire Chief Terrence Baudin explains how fire moves through balloon framed houses.
Kevin O'Connor finds Richard Trethewey in the attic. Richard explains the use of the mini duct system to save the homeowners space in the attic. Later, Tom Silva visits Fire Chief Terrence Baudin who explains why fires travel so fast in a balloon framed house. Meanwhile back at the house, Roofing contractor Tommy Santos and Kevin install a shingle style metal roof.
Problems with Closed Captions? Closed Captioning Feedback
Problems with Closed Captions? Closed Captioning Feedback
Funding for THIS OLD HOUSE is provided by The Home Depot and Renewal By Andersen.
Support provided by:

E19 | Westford Historic Renovation | Heavy Metal
Season 46 Episode 19 | 23m 42sVideo has Closed Captions
Kevin O'Connor finds Richard Trethewey in the attic. Richard explains the use of the mini duct system to save the homeowners space in the attic. Later, Tom Silva visits Fire Chief Terrence Baudin who explains why fires travel so fast in a balloon framed house. Meanwhile back at the house, Roofing contractor Tommy Santos and Kevin install a shingle style metal roof.
Problems with Closed Captions? Closed Captioning Feedback
How to Watch This Old House
This Old House is available to stream on pbs.org and the free PBS App, available on iPhone, Apple TV, Android TV, Android smartphones, Amazon Fire TV, Amazon Fire Tablet, Roku, Samsung Smart TV, and Vizio.
Keep Exploring

This Old House Insider Newsletter
Get This Old House exclusive stories, tips, and behind-the-scenes information delivered right to your inbox every month.Providing Support for PBS.org
Learn Moreabout PBS online sponsorshipKevin: Today on "This Old House"... Our homeowners decided not to go with the traditional asphalt roof.
We'll show you what they decided on and how to install it.
Tom: Then we're going to light this on fire to see how flames and smoke travel through a balloon-frame structure.
Terrence: You can see, actually, the combustibles lighting up right now, Tommy.
Tom: Look at that.
♪♪ ♪♪ Man: Ahh.
That's it.
♪♪ ♪♪ Kevin: Hey there.
I'm Kevin O'Connor.
And welcome back to "This Old House" and to our project here in Westford, Massachusetts, where we've got this beautiful 1893 Colonial Revival, which had a three-alarm fire several years back, and it has been taken back to the studs.
Lots of water damage down here.
This is the condition that our homeowners actually bought it in, and they are committed to bringing this house back to its original glory, saving as much of the original details as they can, including the original wainscoting that's down here on the first floor, and, obviously, the big, beautiful grand staircase in the center of the house, currently being protected by Charlie to make sure that no one goes up and down it.
And speaking of Charlie, good to see you.
How are you?
Charlie: I'm just reviewing and making sure we got everything.
Kevin: Yeah, well, speaking of getting everything, I don't quite get what you did here.
I noticed this last time, but what is with all the framing on top of the existing framing?
Charlie: Believe it or not, this is all structural.
We added them to support a new ledger that runs the perimeter of the exterior walls.
This was all spec'd by the engineer, who had to calculate the load of our new hip roof and widow's walk to meet today's code.
The weight of the widow's walk and the roof load are equally distributed throughout the structure onto various posts and beams, as well as the exterior walls that sit on the old stone foundation.
Kevin: So these extra strips holding that new ledger, same top holding the new weight.
Charlie: That's correct.
So it's all structural.
Kevin: See, I thought you had just done it to get a deeper bay for more insulation, but that actually makes more sense.
Charlie: It's an added bonus.
Now we have roughly 5.5 inches of closed-cell foam in these walls.
Kevin: Alright, well, we're trying to meet that new energy code.
The other structure that I noticed is the obvious LVLs over this double opening right here.
This was sagging when we got here.
I presume that's to straighten that out?
Charlie: That is to straighten that out.
Kevin: Right.
And then there's more two-bys on all of the ceiling joists?
Charlie: Yeah.
So, all the existing two-by ceiling joists had a little bit of a dip in them, so we scabbed on 2x4s beside them and straightened out the ceiling.
-Kevin: A lot of work.
-Charlie: A lot of work.
Kevin: It's an old house.
Don't make it too straight.
-Charlie: It won't be perfect.
-Kevin: Okay.
So, just a few changes on the first floor.
This space right here, which I think was a pantry or a closet, this now becomes a new staircase going down to the basement.
The hallway here, adjacent to the grand staircase, stays the same.
More of that beautiful wainscoting.
And then this back staircase, which used to go to the basement.
The lower stairs have been disabled, but these upper stairs stay the same.
And let's have a look at the second floor.
The focal point of the second floor has got to be this center staircase, which, as it comes up, terminates at this very generous landing right here in the center of the house.
And from this, all the bedrooms come off of it.
So a couple bedrooms on that side, and then a new primary bedroom right here.
And look at how beautiful this bedroom is going to be.
A new bay window here that's been reframed, because that had rotted away.
And then, on this corner, there's going to be a big, generous closet off of the primary.
Or at least that's the plan for now.
And then the one bathroom on the second floor is planned to go back here, behind the back staircase.
But check this out.
This is what I wanted to show you.
So you remember, the fire took off the entire roof, so it was decked over to temporarily protect the house.
And you can see just how bad the charring is in this corner of the house.
But now that new roof has been framed and sheathed, and this attic space -- it's pretty cool.
-Hey, Richard.
-Richard: Hey.
How are you?
Kevin: Alright.
You got the crew up here working hard?
Richard: We are well under way.
We're going to put a new heating-and-cooling system into this building, obviously.
And we're going to have two air handlers -- one on the top floor down-feeding the second floor, and another in the basement up-feeding the first floor.
Now, we could go conventional.
You know, that means full-size ductwork.
But if we did that, we'd need a supply and return from every room.
So that could take some of this real estate that I know the homeowners are going to want to be in.
Kevin: They're totally going to want this space.
Richard: So this really invites us to think about a mini duct system.
We used it before, with the small outlets here and the attenuators.
And the trunk will be right here, and it'll go right around the perimeter, okay?
We're going to break it with two zone dampers -- one for the primary suite, and the other for the other half of the building, pretty much splitting it north/south, the two halves.
Now, the air handler has a blower, and, typically, it might have a refrigeration coil to cool the air and another coil over there to heat the air coming off of a boiler.
-Hydro air.
Kevin: Hydro air.
Right.
Richard: Okay?
But what we're going to do is actually not going to use any refrigerant up here.
We're going to have one coil that'll do both.
We're going to send liquid through this coil, blow air across it, and the water will either be hot to heat the air or cold to cool the air.
Kevin: No refrigerant, water only -- hot or cold.
Richard: Correct.
The difference is how we're going to actually make that water hot or cold this year.
Let me show you.
Kevin: The engineering infrastructure continues down here, Richard.
So, Charlie's got 11 new footings in, 11 new Lallys holding up our house.
Richard: Yeah.
And we're going to insulate this floor and then pour a new floor, which is going to be great.
Kevin: You love the fact the basement's gonna have insulation on all sides, don't you?
Richard: Now, what we still have to add down here is actually another air handler.
Just like we had on the top floor, we down-fed the second floor, we're going to have another air handler and duct system here and up-feed the first floor.
What we're going to use here is actually air-to-water.
Now, air-to-water means we have a condensing unit outside, a big, beautiful unit, and all the refrigerant remains outside.
That thing's either going to make water chilled or hot.
The only thing that's going to come between the outdoor unit and inside right here is two lines filled with water and a little bit of antifreeze.
Kevin: So you're not pumping refrigerant into the house, up to that air handler that we saw in the attic?
Richard: No.
We're using the power of water to deliver all the energy through this building.
And this almost becomes like a heat-pump boiler with a chiller.
So, let's think we're in heating mode.
The piping comes from here up to that air handler upstairs.
Heated water goes through the coil, air blows across it, okay, and it comes back and it goes back to be reheated.
Kevin: That's the winter.
Richard: Right.
This thing knows how cold it is outside.
All of a sudden, it's summer, and it says, "No, let's switch and now bring chilled water."
And we do the same thing going up there.
We blow across that coil, and it cools the air.
Kevin: So that's cold enough to make air-conditioning?
-Richard: Absolutely.
-Kevin: Because I always think of, like, refrigerant as super-cold.
We can do it with water?
Richard: That refrigerator is really cold out there, but it's going to make that water be 40 to 45 degrees, and that's plenty cold to make air cold.
So, now that's typical heating and cooling, but we still have to make hot water for faucets.
-Kevin: Yeah.
-Richard: So, there's another set of tappings, and it can divert over to send heat energy to this tank.
Kevin: So, I think we've seen this before, right?
You guys call these indirect tanks, where you dump the hot into here?
-Richard: No.
-Kevin: No.
-Richard: No.
-Kevin: I walked right into it.
Richard: The indirect tank that we've shown you before works off of a heating boiler.
And what it is, is it's a tank that's filled with potable water.
-Kevin: Yeah.
-Richard: It has a coil inside of it filled with boiler water, right?
Kevin: No flame, just -- Richard: And we transfer the heat to the tank.
But any tank like this, if we take heated water out to the faucets, we have to bring cold water in, right?
-Kevin: Yeah.
-Richard: Which means what?
Cold water comes to the bottom and dilutes the tank.
So we never get the full volume of that tank out to the faucet.
Kevin: Is that not what this is doing?
Because that looks a lot like the one I got.
Richard: Let me show you here.
I brought a cutaway.
Kevin: Of course you did.
Richard: So, there's actually just heating water in here, and this coil is where the potable water passes through.
And the surface area is so big that as the water goes through, it picks up the energy, but it doesn't dilute the tank.
It grabs the energy and comes out into the faucets.
If it does that, this tank can give you over 300 gallons of hot water... -Kevin: Wow!
-Richard: ...forever.
Kevin: So, I just wanna make sure I understand this.
The hot water sits outside here and gives up the heat to the coils.
-Richard: Correct.
-Kevin: So my big takeaway is that as a transfer of heat -- or BTUs, I guess -- you love water.
Richard: Well, if I took a pipe like this, if I wanted to get the equivalent amount of energy out of a duct that I get out of this pipe, it would have to be this size.
This is really the power of water.
So now we could zone this like crazy.
Every part of the building could be zoned.
We could do anything we wanted to do using pipe.
Kevin: You've always got a new trick up your sleeve.
-Richard: I hope so.
-Kevin: That's awesome.
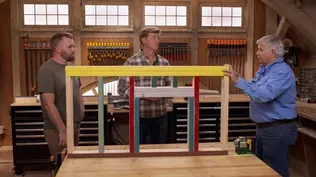
♪♪ This house is balloon-framed, and that means that these studs right here run from the foundation all the way up to the attic, spanning multiple stories and creating this continuous, unobstructed bay.
Now, balloon framing was popular from about the mid-1800s to about 1940, and it was a very efficient way to build.
But now we know that balloon-framed homes are more susceptible to fire damage, more so than the way we frame today, which is called platform framing, where there is a break at each story.
Now, you may recall that this house suffered a fire several years ago, and it started up in the attic.
And that may be the only reason the house is still here today.
To understand why and to see how fire can move so quickly through these buildings, Tommy visited a local fire department for a very important demonstration.
♪♪ ♪♪ Tom: Well, Terrence, thanks for having us up here at the Worcester Fire Department.
And, as you know, we have a balloon-frame structure that we're working on at our project house.
And you guys know an awful lot about balloon-frame structures up here.
Terrence: That's right, Tommy.
We have a lot of experience with balloon-frame structures.
We have over 5,000 triple-deckers in the city.
We call them three-deckers.
We also have lots of two-family construction in the city that's balloon frame.
Tom: Right.
So, what we did is, we built a little mock-up here showing how a balloon-framed structure is put together.
This represents the basement.
And these are the floor joists, or the ceiling in the basement.
And the joists run in and sit on top of the sill down there.
These studs come all the way down and sit on the sill also, and each joist is nailed to the side of the studs.
And each stud travels all the way up to the underside of the roof.
Halfway up where the second or third floor would go, they let in a ledger, and it's notched into the two-bys, and the joists sit on top of that, but they're also nailed to the side of each stud.
That holds the building together.
Up top, you can see how the long stud goes to the underside of the plate.
The old Yankees would leave that top board out into the soffit.
It would create, like, a vortex and actually vent the whole building.
But that also allows the fire to go up in there, right?
So, what we did is, we have two bays on the left that are open, just like the balloon frame is.
And this bay right here, we fire-blocked it.
And we used two different types of fire blocking.
We used wood and also a mineral wool to block first floor, second floor, and the roof.
You're going to light this on fire.
Terrence: Correct.
Tom: So, what do you expect to see?
Terrence: I expect to see a lot more thermal products through the open bays.
Tom: Alright, I'll put this on to block it all off, but also to simulate a plastered wall.
Terrence: So, this is how we're going to build our fire today.
We have dry straw with a little bit of kindling in there -to get going.
-Tom: Yeah.
Terrence: And then we're gonna put a little wet straw above it.
This barrel is cut in specific places to allow a propane torch in to create the ignition at the bottom.
Tom: You have any typical culprits of fires in basement?
Terrence: It could be improper disposal of smoking materials, old, faulty wiring, improper maintenance of heating appliances, your furnaces.
-Tom: I bet that's common.
-Terrence: Yeah, exactly.
If they're not properly maintained, they can create a fire.
A variety of things can cause fires in basements, yeah.
Tom: Yeah, yeah.
Terrence: So, we have a few thermal-imaging cameras set up here, Tommy, to try to track how the products of combustion move through the prop.
-Tom: Perfect.
-Terrence: You can see you got a little bit of smoke coming out now.
Tom: Oh, yeah, we got smoke already.
-Terrence: Yep.
-Tom: That was quick.
-Look at that.
-Terrence: ...up the face.
Tom: Look at how quick that was.
It's coming out the roof.
Now, the flame in the barrel there is actually -- you can see it pulling.
Terrence: Creating the chimney effect, which we were talking about earlier.
-Tom: Yeah.
-Terrence: You can see, actually, the combustibles lighting up right now, Tom.
-Tom: Look at that.
-Terrence: You can see how it's moving upwards through the balloon frame.
And it's coming out the second floor.
Tom: Look at the smoke.
Look at the black smoke coming right up across the floor.
Terrence: Across the floor.
Exactly.
And if you look and you see the bay on the fire-block side.
Tom: Yeah, nothing.
Terrence: There's nothing there.
Alright, we're gonna have to cut it short now, because the prop's burning down.
So let's back up.
Tom: We don't want to burn the truck.
Wow.
Look at that.
Terrence: Now we're going to pull the prop out.
So, as you see, Tommy, we have damage in the two balloon-frame bays, hardly any damage in the fire-blocking bay.
-Tom: There's no damage there.
-Terrence: None.
So that fire blocking did its job and prevented it from going up and extending to other floors.
Tom: Shows the importance of the fire blocking, -that's for sure.
-Terrence: Correct.
If you have fire blocking, if you're retrofitting a balloon-frame structure, fire blocking is very important.
And I also want to hit balloon-framed structures aren't more apt to catch fire than other structures.
It's just what happens when they do catch fire that's the problem.
So I don't want people being afraid, if they live in a balloon-framed construction house, that their house is going to catch fire.
Tom: I actually live in a balloon-framed house.
Terrence: There we go.
So right there.
Most importantly, you want to make sure you don't overload electrical outlets and, also, you have working smoke detectors and carbon-monoxide detectors, which will allow you early detection to get you out safe.
You want to make sure you have two means of egress and that all the members of your family know about the plans on how to get out if there is an emergency.
Tom: Right.
Terrence: And get out to your neighbor's house, call 911 from there, because, as you can see, how quickly the fire can spread.
Tom: I couldn't believe how fast the smoke was moving, and then, once the flame took on, it was like, whoa!
-Terrence: Correct.
-Tom: But, as you said earlier, I think one of the key things that a lot of people don't think about is get your heating plant or source serviced annually.
Terrence: Correct.
Proper maintenance will hopefully prevent a tragedy from happening.
Tom: Yeah, yeah.
I want to thank you very much.
-Terrence: Pleasure.
-Tom: Your team did a great job.
♪♪ ♪♪ Kevin: Charlie.
-New roof system, huh?
-Charlie: What do you think?
Kevin: I don't know what to think yet.
I'm gonna let you know when you finish explaining it to me.
-What are we doing?
-Charlie: Well, it's metal.
It's actually steel with a galvanized zinc coating over it for protection.
Kevin: Okay.
So, I mean, what were our options?
We lost the roof in the fire.
We had to put it back on.
Charlie: Which was originally slate, though.
Kevin: Right.
Charlie: And the homeowner did not want to go back to slate because of the cost and, believe it or not, the maintenance also.
You really have to take care of a slate roof over time.
-Kevin: Slate can be expensive.
-Charlie: It can.
Kevin: Alright, so, asphalt was obviously an easy choice.
Charlie: But Historic approved this.
Kevin: Ah!
Okay.
Charlie: And the homeowners love it.
Kevin: So, when I hear "a metal roof," I think of sort of standing seam going from the drip edge up to the ridge.
This, though, is a shingle.
Charlie: And, actually, this is about a third less the cost of that typical standing-seam roof also.
Kevin: Alright.
So, the process for installing it is what?
Charlie: Well, similar to an asphalt roof, you start with a drip edge also.
Kevin: That you got or that comes with the shingles?
Charlie: We give them the measurements and we get everything except the nails, and we can supply those.
And once you put the drip edge on, you put this self-adhering water barrier on the entire roof.
Kevin: We've seen that protocol before.
Charlie: We have.
And then, after you have all of the water barrier on, you put this drip edge on the edge of the roof.
Alright, if you want to nail this, we'll start right here.
And it's about right on this ridge.
And there's a nailing pad about every 8 inches.
Kevin: I'm just gonna stop at the last bit of underlayment right there, okay?
Charlie: And then, before we put any shingles down, we have to put this self-adhering strip down.
And it goes right in this center channel here.
Kevin: This is sort of an edge detail right here?
This only goes on our flange?
Charlie: And this is to prevent any water that might blow in, hit this drip-edge channel, and come back over the shingles.
So, it's a peel-and-stick -- comes right off.
Kevin: There you go.
That's for you.
Okay.
Again, just something else that comes with the system?
Charlie: Everything comes with it.
That's right.
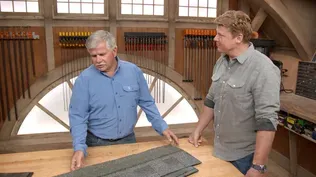
Kevin: So, Charlie, if I look at one of these shingles, obviously, you've just got a film on it to protect it, just to cover it for now.
but at the top, it has been folded down to create a little overlap there.
On the bottom, it's got the same thing.
Charlie: It's the locking channel that will lock into the edge of the drip edge.
Kevin: So the idea is that this is going to actually overlap and then just tuck right into that drip edge?
Charlie: Locks it right in.
That way, it can never come up.
So, a 40-inch shingle requires four nails.
So we're just going to space them evenly.
And now that piece of paper -- if you want to just peel that off.
Kevin: So, every shingle has got that sealant on its right-hand side.
So you're starting left, working your way right -because of that?
-Charlie: That's exactly right.
Kevin: Peel this off.
Wash, rinse, and repeat for this entire first course.
Charlie: That's right.
Kevin: And then, for the course above it?
Charlie: They actually come pre-cut.
So, it's half the size of the full-size shingles.
Kevin: So that's how we get our staggered pattern -over the seams.
-Charlie: That's right.
And instead of locking on the drip edge below, it's going to lock on the shingle below it.
Kevin: Oh, this is interesting, Charlie.
So once that sort of locks in, that sort of automatically sets your reveal and keeps you parallel.
Charlie: That's right.
So you have 9-inch, 9-inch all the way up the roof.
Kevin: And then, so, nail, and then we keep going this way?
Charlie: That's right.
One in.
That's good right there.
Kevin: So, pretty much the same as we move our way up the roof.
So, at what point can we take off the protective membrane here, if we were up on the roof?
Charlie: Well, really, the rule of thumb is, -you complete the roof... -Kevin: The whole thing.
Charlie: And then you'd work your way right back down, peeling everything off.
Kevin: Can I cheat right now, just for our own purposes, so I can see what it looks like?
Charlie: Do a reveal.
Kevin: Get this one and that -- Oh.
So, it's actually got a grain pattern to it right here.
Oh, yeah, looks pretty good.
I like that slate color right there.
That's going to look good up there.
Charlie: It does look good.
And the good news is, they're waiting for you up top.
They need one other guy up there to help.
-Kevin: Me?
-Charlie: I'd go, but I have to go see the subs.
Kevin: "Subs."
Like subs for lunch?
Charlie: Yeah, I'll get you one.
Kevin: Alright.
Thank you, Charlie.
-Tommy, how are you?
-Tommy: Good, Kevin.
-How's it going?
-Kevin: Going all right.
Will you clip me in there?
I am a freshly minted graduate of metal roof shingling, so I'm here to help.
Although, it looks like you got it well under control.
You got most of this side done.
You got drip edge and underlayment on this side.
So, where do you want to start?
Tommy: So, Kevin, we're going to start here on this hip, get ourselves going, and start running the roof this way.
Kevin: Okay.
I presume we start with a shingle.
Tommy: Yeah.
Take one of those.
Kevin: There's that guy.
Tommy: We're gonna line it up right here -- corner on the corner of our drip edge right there.
Kevin: Roger that.
Tommy: Gonna take this square here.
Kevin: Tell me where you want to be.
Tommy: Perfect.
So, Kevin, we're going to take this power shear and we're going to cut through this pretty thick material with it.
Kevin: Very nice.
Very nice.
Tommy: I'm gonna finish it off with my snips from the other side.
And this should be ready to install.
♪♪ I'm gonna stop my stagger now.
That way, I can get up three courses and have a good base so I can just run out the rest of the roof this way.
♪♪ So, Kevin, before we get too far ahead of ourselves, let's install a snow-guard system.
Kevin: Snow guards, right?
Standard operating procedure with a metal roof, right?
Tommy: Correct.
These snow guards here will break up any snow sliding down from the top.
Once it hits it, it'll hit the first course, break up, hit the second course, and hopefully, by the third course, it's all slowed down and nothing's damaged down below.
Kevin: Okay.
♪♪ Kevin: Same thing all the way up, right?
Tommy: Correct.
Kevin: Leaves us with a seam, though, here at the hip.
How do you want to treat this?
Tommy: You're going to put on this spacer here.
Kevin: This all happens once the roof is complete?
-Tommy: Correct.
-Kevin: Okay.
Tommy: And then we'll install this cap that was provided with the spacer and the rest of the roof kit.
-Kevin: And that goes on there.
-Tommy: Right on.
It's going to slide over nice.
Kevin: So, the cap comes to us in a rectangle, and for this first one, you trimmed it, bent it for us?
Tommy: Correct.
Kevin: And then, obviously, they just interlock, like the shingles do, and it goes all the way up.
Pretty cool system.
Actually learned a lot working with you.
I appreciate you letting me tag along.
-Tommy: No problem.
-Kevin: Yeah.
Tommy: It looks like your ride's here.
Kevin: Oh, my goodness!
Charlie Silva!
Charlie: I can't believe how hot it is up here.
Kevin: I bet you can't.
Charlie: No, I can't.
Kevin: First-class service.
Charlie: Nothing but the best for you.
Kevin: Hey, listen, an hour or two ago, I'm a student, and now, up here, I'm, you know, number-six guy on the roof.
Charlie: I tell you, it really looks good, though.
-Kevin: You like it?
-Charlie: I do.
Kevin: Yeah, I like it, too.
Tommy, thank you.
-Appreciate it.
-Tommy: No problem.
Kevin: So, what have we got coming up next time?
Charlie: We're going to start the restoration of our main staircase, and then we have electricians and plumbers starting.
Kevin: Alright.
All that coming up next.
So until then, I'm Kevin O'Connor.
Tommy: I'm Tom Santos.
Charlie: And I'm Charlie Silva.
Kevin: For "This Old House" here in Westford.
Kevin: Next time on "This Old House"... How do you de-lead a 131-year-old staircase?
Call in the experts.
Man: We started out by taking apart the balusters, because there's about 100 of them in here.
But everything else that can't be removed is being stripped in place.
Tom: And we're working on the widow's walk.
We're going to make it watertight and prep for the railings.
Jenn: And we're enjoying a New England tradition right here in Westford.
Kevin: That's right.
How do you like them apples?
-Jenn: Really, Kevin?
-[ Apple crunches ]


Support for PBS provided by:
Funding for THIS OLD HOUSE is provided by The Home Depot and Renewal By Andersen.