E22 | Urban Gardens, Apron Driveway | Ask This Old House
Season 23 Episode 22 | 23m 42sVideo has Closed Captions
Detroit urban pollinator gardens; impact drivers vs drills; cobblestone driveway apron.
Jenn Nawada speaks to a nonprofit that is creating urban pollinator gardens around Detroit. Then she helps a couple start an elevated herb garden bed. Sharing tips on soil preparation, planting techniques, and maintenance; Tom Silva gives a quick breakdown of impact drivers and power drills; Mark McCullough helps a homeowner remove his brick driveway apron and replace it with cobblestones.
Problems with Closed Captions? Closed Captioning Feedback
Problems with Closed Captions? Closed Captioning Feedback
Funding for THIS OLD HOUSE is provided by The Home Depot and Renewal By Andersen.
Support provided by:

E22 | Urban Gardens, Apron Driveway | Ask This Old House
Season 23 Episode 22 | 23m 42sVideo has Closed Captions
Jenn Nawada speaks to a nonprofit that is creating urban pollinator gardens around Detroit. Then she helps a couple start an elevated herb garden bed. Sharing tips on soil preparation, planting techniques, and maintenance; Tom Silva gives a quick breakdown of impact drivers and power drills; Mark McCullough helps a homeowner remove his brick driveway apron and replace it with cobblestones.
Problems with Closed Captions? Closed Captioning Feedback
How to Watch Ask This Old House
Ask This Old House is available to stream on pbs.org and the free PBS App, available on iPhone, Apple TV, Android TV, Android smartphones, Amazon Fire TV, Amazon Fire Tablet, Roku, Samsung Smart TV, and Vizio.
Keep Exploring


This Old House Insider Newsletter
Get This Old House exclusive stories, tips, and behind-the-scenes information delivered right to your inbox every month.Providing Support for PBS.org
Learn Moreabout PBS online sponsorship♪♪ -On "Ask This Old House," our experts travel across the country to answer questions about your house.
♪♪ Today, Jen heads to Detroit to learn about the bee population, then creates a garden to attract the local pollinators.
-Ooh, it smells so good, -I know.
-Next, Tommy breaks down when to use an impact versus a drill driver.
And Marc helps a homeowner whose driveway is in need of a repair.
All that on "Ask This Old House."
-Today we're in Detroit, the Motor City, a place known for its rich history, vibrant community, and incredible resilience.
We had a homeowner write in asking for help starting a pollinator friendly vegetable garden.
First, I want to learn more about a local group that's dedicated to transforming urban spaces into havens for bees and other pollinators.
And Tim, you're the man behind this.
-Hey, how's it going?
-What's going on?
-Oh, just enjoying life.
How are you?
-I'm pretty good.
I'm psyched to be here.
-Awesome.
-Why don't you tell me about how you have started revitalizing all these urban spaces?
-Yeah.
So Detroit Hives, we operate as a nonprofit for over eight years now, working to create inclusive spaces for both people and pollinators.
-When you're designing a space or you obtain a space, what do you consider to create the garden?
-Great question.
I think what we want to consider is a space, a design for both people and pollinators.
So I think the best thing is to create a diverse environment.
Different types of flowers that are blooming through the spring, summer, fall and winter.
-So throughout the seasons.
-Absolutely.
This creates biodiversity, inclusion, great for native bees and pollinators.
Something to feast on all summer long.
-Right.
I love all the combinations of plants and the diversity that it invites.
I mean, right now I see a monarch over on the milkweeds.
The bees are everywhere.
It's a great selection of plants.
So how does Detroit play a role in supporting bees?
-I'm glad that you asked.
So Detroit has been dubbed the Motor City for over a century, but Detroit is more than a motor city.
As of February of 2024, Detroit is now a bee city.
-Absolutely, I know, right?
-Fantastic.
-So with Detroit now being a Bee city, we're now supporting Michigan's 465 native bee species.
This particular land that we're standing on right now was donated to our organization.
From there, we've been able to form a community partnership with the city of Detroit and buying back more vacant lots right here in our city.
-And then it helps with everyone's vegetable gardens, the food sources.
-Absolutely.
In a way, pollinators help create a triple bottom line solution in place of the vacant lots to create a social, environmental, and financial impact, opportunities for civic engagement, opportunities to support our conservation, and then lastly, financial by supporting farmers through cross pollination services.
-All right, Tim, thank you for educating me on your nonprofit organization.
You're doing a wonderful job educating the public and bringing the community together.
-Thank you.
We love it.
-All right.
-Be well.
-All right.
Take care.
♪♪ Hi, Katrina.
-Hi, Jen.
How are you?
-I am great.
Thanks for having me.
-Welcome to Detroit.
-It is beautiful.
I love the journey here.
All your tree lined streets, these brick colonials.
It's gorgeous.
-So this is actually the historic Boston-Edison neighborhood.
Henry Ford and the other auto barons created this neighborhood in the 1900s.
And what's really cool about it is that there are over 900 historic homes, all different types that they created for their families and their kids and so many other people.
So now we have the benefit of living in this beautiful neighborhood since 2017.
-Yeah, I love the vibe here.
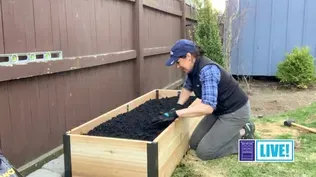
So you wrote in about having raised beds and wanting to grow vegetables or herbs.
-Well, yes, my husband is a huge gardener, so I like to call myself his assistant.
And knowing that we have found an awesome raised, reclaimed nursery bed.
So once we got it home, my husband was trying to figure out what he really wanted to do with it and I saw the opportunity, wrote in, and I'm so glad that you guys really were interested -in working with us.
-Fantastic.
Well, can we take a look at it?
-I would love that.
My husband's in the back.
-Perfect.
Let's go check it out.
-Jen, I want to introduce you to my husband, Dequan.
-Hey, Dequan.
-Hello, Jen.
How are you?
-I'm very good.
Nice to meet you.
And want to tell me a little bit about this planter?
How'd it get here?
-It's a reclaimed raised bin, and I really like it.
You know, we come from tilling it, so you don't have to bend over and break your back anymore.
-That's a very good point.
The whole back breaking thing.
I mean, I like how it's assembled and it's great.
You already have drainage rock in here.
This is a really lightweight rock, and it's coated all over the bottom so the water could just go through.
And then I see all the drainage pipes below.
This whole thing drains this way and it'll go straight back into the ground.
-Okay.
-So I brought a few plants if you guys want to check them out.
-Sounds good.
-Okay.
-Okay.
-All right.
-This is the display I wanted to show you, and I'm just going to run through them, okay?
-Okay.
-Starting with the basil.
There's four different varieties.
This purple one is called amethyst basil.
Beautiful.
It gets about like 12 to 18 inches.
This one is bush basil.
And they're all gonna have different flavors, right?
So you can mix them with food.
You can mix them in drinks and like, a cocktail or something.
So that's bush basil.
This one's blue spice basil.
It's going to stay tiny, small leaves.
So maybe we put that closer to the edge.
And this one is called lettuce leaf basil.
These leaves get pretty big, and some people can use it as a sandwich.
Instead of using like a pita or something, you could wrap your chicken sandwich or whatever you want to put in it and just use that as the instead of bread.
So that's kind of cool, right?
-Yeah, that's really cool.
-Different.
-So that's a variety of basil.
And then we have lavender for aromatics.
And you know some people like to use it as tea or use it as something soothing.
Over here we have some Anaheim peppers.
-He's a pepper guy.
So that's going to go great.
-Flowers.
They're already flowering.
The peppers are coming.
And then we have oregano.
-Yes.
My favorite.
-Your favorite.
-Yes.
-Good, good.
I like the different texture and lemongrass.
Do you guys like lemongrass?
-Love lemongrass.
-Love, love, love.
-How do you use it?
-Cooking and in teas.
-Okay.
My husband loves to grill, so we're able to use it on chicken.
-Oh, tasty.
-Drying it out.
Just a few other, you know, really cool ways that we had no idea how much you could use it.
-Yeah.
-And it smells great.
-It's a beautiful smell.
So that is a keeper for sure.
And then for the pollinators just to attract some other pollinators in.
Nice little landing pad on these zinnias.
And these are pentas.
Just a little pop of color in there.
-Okay.
-Okay.
-What are these guys?
-Oh!
I almost forgot.
These are called nasturtiums.
These are the nasturtium seeds.
A nasturtium is an edible flower.
Like you would see it at a restaurant at the corner of a dish -- -Oh, okay.
-That bright orange or yellow flower.
So it's these seeds that will sow directly into the soil.
But before that we're going to just put it -in a cup of water.
-Okay.
-And then, so this will help them swell a little bit and then we'll just pop them right in the soil.
Overall, what do you think?
-This is great.
This is really, really great.
-Let's put the soil in.
-Okay.
-All right?
-Sounds good.
-Cool.
Another benefit of having a raised bed is the soil.
You get to pick a nice organic soil, a good growing mix that you can put in here.
and that you know it's not contaminated.
If you grow in contaminated soil, anything you grow and eat from there, then you get those contaminants in.
All right, so I just want to keep the soil level like -inch and a half below-ish.
-Okay.
-You know, so when there's a heavy rain.
It's not going to just like -- it'll give it a chance to drain - and not blow over.
-Spill over?
-Yeah, yeah.
-Okay.
-We're going to split this into two plants.
So that means we'll have four lemongrass.
-That's perfect.
-That's awesome.
-So maybe -- -Oh, it smells so good.
-I know.
-You want me to put it -- -Should we alternate like lemongrass, this, lemongrass, across the center?
-Let's do it.
-All right.
When planting the garden bed, I placed the taller plants in the center and the shorter plants along the edge to ensure they get plenty of sunlight.
And then these are so small, we could kind of plant like some together.
-Okay.
Yeah.
-And then what else do we want?
More basil in there.
Another pepper.
This looks so good already.
Look.
I'm liking our layout.
♪♪ Okay, so we dumped out the water.
So these seeds are swelling just a little bit.
It just gives them a little head start -before you put in the soil.
-Okay.
-And then if you're done laying them out, then we'll pop them in.
Okay, even though it's raining, you still have to water.
Okay?
So just like, give this all a good drink and, you know, keep an eye on it.
Don't let it dry out.
And then everything will start to flourish when these peppers start to grow.
You might want to stake them with a little bamboo stake because they're going to get heavy.
But otherwise just let them grow and clip and eat as you go.
-Now, what would you suggest for the winter time?
We're in Michigan, so will we cover it, leave it open?
What do you think?
-I would clear everything out, and then you could put, like, -a piece of plywood on top.
-Okay.
-What about adding compost to the garden?
-Okay, we'll go with what he says.
Let's add compost to the garden and keep it on top.
-And then springtime -- -Both: Turn it over.
-All right.
Okay.
Great idea.
-Good call, good call.
Thanks for having me here in Detroit.
It's so amazing.
-It was a pleasure, Jen.
-Yeah.
You guys are awesome.
-Okay.
-See ya.
-See you later.
-Have a good one.
-Take care.
-Bye.
It looks great.
-I can't believe the lavender is so beautiful.
♪♪ -Tommy.
-Hey, Kevin.
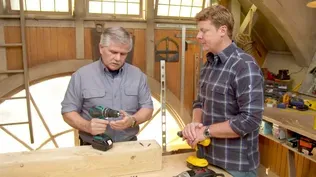
Drill drivers, impact drivers.
When are you grabbing one versus the other?
-If I'm doing a lot of framing, especially if I have a lot of engineered lumber and big screws, I'm gonna get an impact driver.
-So impact drivers got, like, almost like a little hammer action in the back.
And that's helping you drive and actually get over the resistance of, say, engineered lumber?
-And keeping the two -- the screw and the attachment together.
Tightly.
-And when are you grabbing the drill driver?
-If I gotta drill a lot of holes and maybe drive a couple of screws here and there, I'm gonna get a drill driver.
-So, you know, you're doing some nice clean holes or if you're doing a countersink, you just want the rotation.
-You just want the rotation.
You can drill with a drill like that and you can drill with an impact driver if you have the right attachment that would fit in it.
And they have to be impact rated also.
-So what's this idea that an impact driver is helping you keep good contact between bit?
-Yeah I mean the drill -- this is a Phillips head and it's got a V on it.
And that matches the angle of the tip.
So it seats in there really nicely.
And you want to make sure that it all lines up in all the directions of the circle.
When I drive it, you start the screw, give it a little start and then push on it hard.
[ Whirring ] Drives the screw home.
-And the comparison to this is that you might not get great contact?
-Well, you get good contact, but sometimes it falls out.
It takes a little more effort to get it started, and I want to force it in and push hard.
See how it wants to slip out?
[ Screeching ] -Oh, the worst sound when it's stripping.
-It's terrible.
So now if I keep doing that, this tip is gonna get ruined and the screw is gonna be junk.
-Okay, well, good that we've got both at our disposal.
-Absolutely.
♪♪ -Doug.
-Hey, Mark.
-How are you doing?
-How are you doing?
-Nice to meet you.
-Nice to meet you.
-Thank you so much for coming by.
All right.
So, on my way in, I think I saw a little driveway project.
-Yeah, we have a project right here.
I'll show you where it is.
-Let's check it out.
-Yeah.
Great neighborhood over here.
-Oh, yeah.
-Great neighbors, too.
-I noticed on my way in.
So it looks dynamite.
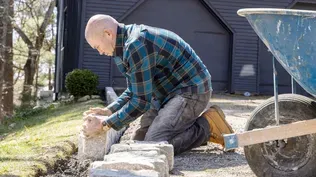
-Yeah, so this is some decorative brick we had put in when the house was originally built, and it's really starting to look crummy.
The brick's starting to break up, and we've tried to do some repairs to it, but it's just not working anymore.
So we were thinking we could put in some cobblestone.
-Okay, so I love the idea of cobblestone.
Not only is it durable, which is most important, but it's very aesthetically pleasing.
So I think it's gonna be a good choice.
First thing we're going to have to do is take everything out so the brick has to go.
There might be a concrete pad under that.
If there is, we're gonna have to take that out.
So this is a super doable project.
All we have to do is get the right tools and get going.
-All right.
-All right.
Let's go.
♪♪ -Plug me in.
-Okay.
-All right, so now that the tools are all set, Doug, the first thing I'm gonna look for is what I call the least path of resistance.
-Okay.
-You can see that the asphalt is binding us in to the brick over here.
The concrete's doing the same thing.
But if you notice on the edges, I have a free path to chip away.
So if I didn't have that area to do, I would find an area in the middle and I would create my least path of resistance -using that sledgehammer.
-Okay.
-The only other thing that I would worry about is chipping the edges on the concrete and chipping the edges on the asphalt.
That's what I'm gonna use the demo hammer for.
♪♪ -Wanna give it a try?
-Sure.
-The only thing I would suggest is when you go down, pull it up.
Don't use the jackhammer as a pry bar.
-Okay.
♪♪ ♪♪ -Cleaned it up very nicely.
Now let's get everything into the wheelbarrow.
-All right.
♪♪ I don't want to be the guy who's going to have to move this wheelbarrow.
That's for the homeowner.
[laughs] Just like I thought.
Four inch pads really no good.
So we're going to take it out the same way we took out the brick.
♪♪ [ Whirring ] All right, Doug, now we're going to start the base.
I'm going to want you to dump that gravel right there.
-All right.
-I'll spread it.
The gravel is for drainage, but it also acts as a shock absorber.
So if a stone is buried and the frost picks up the stone, it spreads out the gravel a little bit.
And then when the frost melts, it goes right back into place.
Now, Doug, I usually like to go a little heavier with the gravel, but because the base is already existing, we're just topping it off.
-Okay.
-This is actually one of my oldest tools.
-Oh.
-I've had this almost for my entire career.
-Wow.
-This hand tamper and myself are very good friends.
I've spent a lot of time doing this, but you can see how easy this is.
-Yeah.
-I just go back and forth.
I try to hit down as evenly as possible, and I work myself from back to front because I don't want to step on anything, I just compacted.
So if you want to jump in, give it a shot.
-Hopefully I use it as well as you did.
-All right.
-Your old friend.
-There you go.
You're doing fine.
Don't be afraid of that.
Give it some -- Give it some weight.
Again, you're not gonna hurt anything.
There you go.
-A lot heavier than I thought.
-Well, a little bit of work, but your body's gonna feel great.
Don't forget, the body wants to move.
And no dues for the gym.
This is all free.
Okay, Doug.
So now we're going to pour the concrete.
This concrete that we're using is high strength because we want to get the cobblestones right on it.
And all we have to do is water, because it's pre-mixed already.
-Does it take a long time to dry?
-So this is fast setting concrete.
So by the time we get to the cobblestones, it should be pretty set up.
-All right.
-There you go.
That's good.
Oh.
So we're going to use this as reinforcement.
-Why do we need to use this?
-Well, as we know, plow comes this way, cars come over this, so when we come in with our extra two inches of concrete, which is going to be monolithic when it hardens, this is going to encapsulate the rerod and then reinforce the concrete.
All right.
-Before we get going, I just wanted you to take a look at the cobblestone.
-It looks really nice.
-All right.
They call this a Belgium cobblestone.
They can be picked up at any masonry yard.
-So what's the pattern we have here?
-So what I have set up is what we call a running bond.
It's the most common.
So that's why we're going to use it.
-How do we get the height to be the same across all the different stones.
-So that's the beauty of doing an infill.
The height is predicated to us.
So we have concrete right here.
We have asphalt right there.
We're just going to carry the heights between the concrete and the asphalt as we go.
You're just going to hand me a shovel full of concrete when I need it.
That's going to level me up.
And we're also going to run a string in between the cobblestones.
This edge is kind of erratic, but the string will keep us in a straight line.
Great.
So, Doug, as I said before, we're married to the height.
We want to take a straight edge again, make sure that cobble is in line.
-Okay.
-It is.
And now I'm going to pound it down.
So people can do this one or two ways.
They can pour a pad, then they can come back and install the cobblestones the next day.
What I like about our method is, as you see me trying to even out this cobblestone, I'm actually interlocking it with the wet concrete.
So once the wet concrete hardens, you've got just a much better job.
-Okay.
And it gets done in one day.
-And it gets done in one day.
♪♪ That'll take me down.
♪♪ -Take my.
Grab that hammer.
♪♪ ♪♪ ♪♪ [ Hammering ] -So now it's time for the jointing.
-Okay.
-All right?
We're going to use a type S mortar.
It's a very, very hard stone.
So we don't need a lot of flexibility.
We're actually looking for strength.
-What's the consistency of this supposed to be?
-So we're going to stay with the oatmeal.
-Okay.
-Oatmeal's our friend.
To help us along with the grouting, -we're going to use grout bags.
-Okay.
-Now, when I was a young guy, we never used these.
They're for bakers, when you decorate cakes, but they're a super efficient way to joint off cobblestones.
Make sure you get in between.
-Now, these are head joints.
-Mm-hm.
-These are bed joints.
-Okay.
-Both equally important.
So just make sure you fill them all from the bottom to the top.
-Okay.
-All right, Doug, so when we start jointing these cobblestones up, a couple of things I want you to notice about the tool that you have in your hand.
-It's called the jointer.
-Okay.
-One side is usually smaller than the other.
-Okay.
-The smaller side we like to use for the head joints, which is what we're going to do first.
-Okay.
-And then as the joints vary you'll decide whether you're going to use the thin part or the thicker part.
-Okay.
-And we want to float this tool back and forth.
And again when we're coming back towards us we want to use the heel.
Once it sets up a little bit more, we'll be able to peel the mortar off the edges of the cobblestone.
And now for both edges of the driveway, I'm going to add some mortar and smooth it out at an angle to create a berm.
This will help hold cobblestones in place, and also shed any water away from the driveway and back to the soil.
And like any repointing job, neatness counts.
So we'll finish up cleaning the excess mortar with a wet sponge and slicking the joints with a joiner.
All right, Doug, what do you think?
-This looks unbelievable.
Can't believe we did it in one day.
-All right, well, we had a great day, but I am going to leave you with a little bit of homework.
-Okay.
-You know those berms that we built up?
-Yeah.
-We did add some dirt on both sides.
They're going to need seed and they're going to need some water.
And you'll get the grass.
-I'll get right on it.
Mark, just one question.
When can I drive on it?
-So wait 72 hours and you should be good to go.
-Mark, thanks for everything.
It was a real pleasure.
-All right.
-I appreciate all your help.
-I had a great day, Doug.
-It was awesome.
-And if you have questions about your house, keep them coming, because we'd love to hear from you.
I'm Mark McCullough for "Ask This Old House."
♪♪ Next time on "Ask This Old House" -- Do you struggle to keep your home constantly cool?
Ross helps a homeowner troubleshoot their AC problems.
Then we meet with a blacksmith who forged ahead, turning her passion for working with metal into a career.
And Mauro helps a homeowner remove some scaly shellac.
-Oh my gosh.
-Oh, wow.
-That came right off.
-All that on "Ask This Old House."


Support for PBS provided by:
Funding for THIS OLD HOUSE is provided by The Home Depot and Renewal By Andersen.