The Best of the Joy of Painting with Bob Ross
Surprising Falls
Season 38 Episode 3824 | 27m 20sVideo has Closed Captions
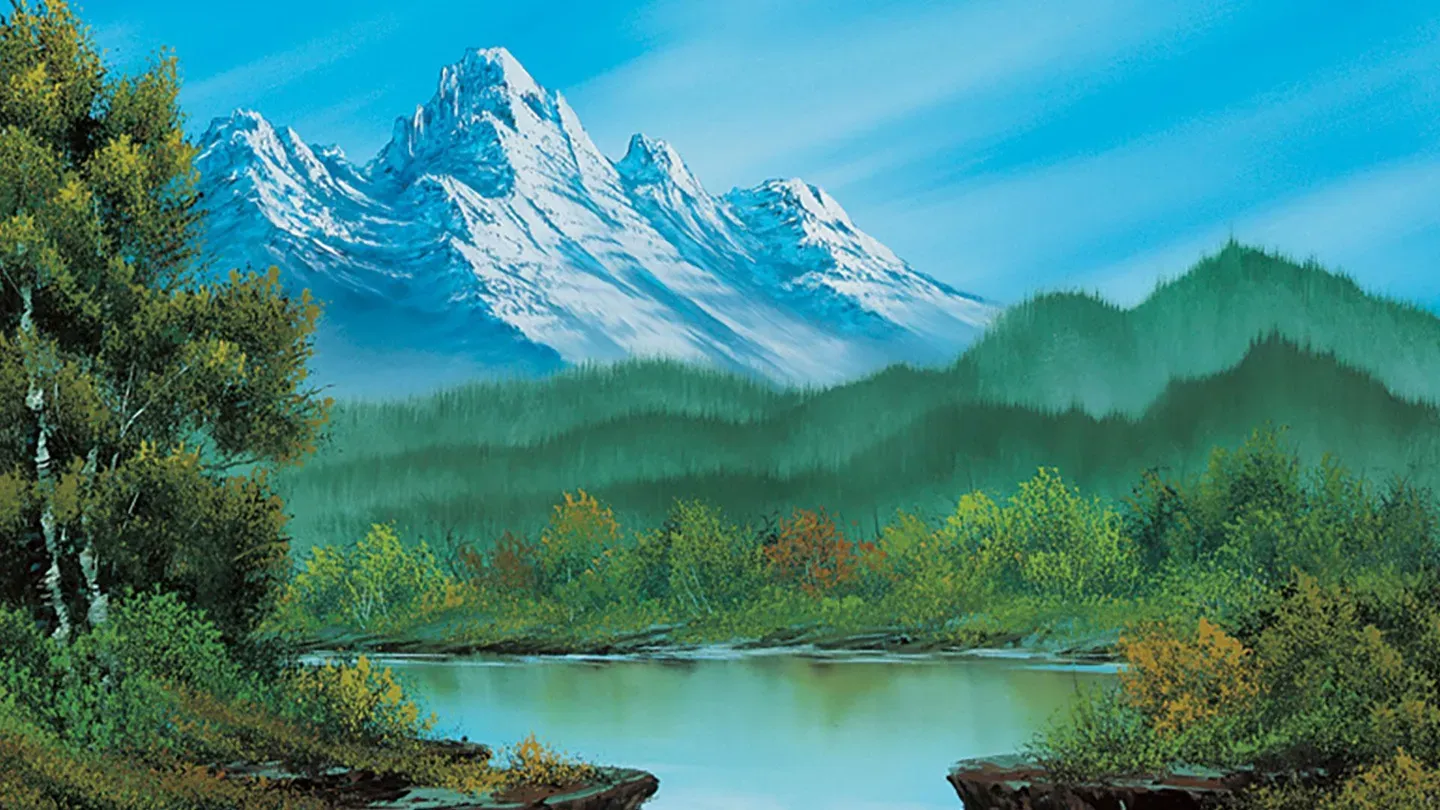
Guest artist Steve Ross paints the beauty of a lovely mountain.
Guest artist Steve Ross enhances the beauty of a lovely mountain with splashing waterfall and autumn foliage.
Problems with Closed Captions? Closed Captioning Feedback
Problems with Closed Captions? Closed Captioning Feedback
Distributed nationally by American Public Television
The Best of the Joy of Painting with Bob Ross
Surprising Falls
Season 38 Episode 3824 | 27m 20sVideo has Closed Captions
Guest artist Steve Ross enhances the beauty of a lovely mountain with splashing waterfall and autumn foliage.
Problems with Closed Captions? Closed Captioning Feedback
How to Watch The Best of the Joy of Painting with Bob Ross
The Best of the Joy of Painting with Bob Ross is available to stream on pbs.org and the free PBS App, available on iPhone, Apple TV, Android TV, Android smartphones, Amazon Fire TV, Amazon Fire Tablet, Roku, Samsung Smart TV, and Vizio.
Providing Support for PBS.org
Learn Moreabout PBS online sponsorship[Music] [Bob] Hi.
I'm glad you could join me today.
You know in the past we had a young artist on the show that was so fantastic and we got so many cards and letters talking about how great this young man was.
We've decided to bring him back.
And today it's my absolute pleasure to introduce you to my son, Steve.
And Steve [chuckles] the little devil can paint.
He travels all over the country and he teaches literally hundreds of people the joy of painting.
And I'm asked him to come here today and show you what he can do in just a couple of minutes.
So Steve, if you'd show them how to do a fantastic little painting I'll get off here and I'll see you at the end of the show.
[Steve] Okay.
Thanks a lot, Dad.
What I'm going to try to do today is a waterfall scene.
And I'll add a few different things I usually don't put in.
Like a bushy tree over on this side and a birch tree over on this side.
And like I said before, they'll probably be a huge waterfall down here in front.
So what I'm going to start out with is a little bit of Phthalo Blue in the sky.
And I'm just going to smash that straight down into the brush.
Try to get a nice even distribution.
And if you want a real dark sky, you're going to need to use a lot of paint.
And of course if you like the more light, soft, subdued sky then you just use very little, in kind of a soft pressure.
But I like the dark shapes so I'm going to try put a lot of pressure on it.
And generally when I load the brush I always will go right up into a corner and start there and work into the center.
And as you do that, the brush picks up the liquid white and gets lighter.
The sky gets lighter automatically towards the center of the painting.
And that's what you're looking for.
So I'll just throw in something like that.
And then maybe I'll go into a bit of Phthalo Blue and Phthalo Green.
Just a small amount of that Phthalo Green.
And down here in the water, we'll just put some straight horizontal strokes in.
Now I'll come back with a clean, dry brush and try to blend all this out.
Saving that light source in the center at least a little bit, if I can.
Mainly what I'm trying to do here is just to add pressure on the areas where the dark and the light come together.
When you get through blending your sky, you really shouldn't be able to see where the light stops and the dark begins.
So you should end up with something similar to that.
And then down here in the water, you just make your straight horizontal strokes.
And try to save a little bit of that light there too.
Okay.
Maybe in this one we'll have a mountain.
So what you want to do is get your palette knife and mix a few colors together: Van Dyke Brown, Prussian Blue, and maybe just a little bit of Alizarin Crimson too with that.
Sort of looking for a dark purple.
Mix that up real good.
Then come up to the canvas and maybe right here, start in with a real, rough, rugged mountain shape.
And you want to be careful not to get too wild because if you get your mountain too large about the only thing you can do is nail another canvas on top of this one and start over.
But say you didn't like a part on it, like right here, you could just make it a little bit bigger.
So if it's your first mountain I'd recommend starting off with kind of a small one and then making it bigger and bigger until you like it.
Now once I get the shape in, I'm going to try to scrape most of that paint away.
And come back with my big brush and pull that right out.
Want to be careful not to get too close to those top edges.
Okay.
And then maybe a little snow.
Just using titanium white.
Picking up a little on the knife, like this.
And just right on top of those edges closest to the sun.
Very light pressure.
And right over here maybe just a little bit, kind of like a glacier formation or something.
And then when you go in for your shadows, you'd want to use white with a little bit of Prussian Blue.
It's a real simple shadow color.
And kind of leave the paint marbled a little bit where you can see some of those dark blue streaks in there.
And remember our shadows are a reflection of the highlight so you'd want to have it break over here just like it did on the other side.
So use real light pressure and maybe even the small blade on the knife every once in a while if you're working in a real tight area.
Right here.
Kind of pull down with the contour of the mountain.
If the mountain doesn't go straight across then you would want to pull it, you know, down at that same angle.
If you see the dark line on the back of the mountain coming down like this that's the same way you want to make the shadow.
So I'd come over like this a little and then drop.
Most important is leaving your dark areas.
You'll notice that I harp on that through the entire painting on every single step we do.
I'll say "Always leave those dark areas there.
It takes dark to show light."
Okay and then down at the very bottom of your mountain you can use your big brush and make a little bit of mist.
Just by tapping up into it.
And then kind of lift to get rid of those tap marks.
Okay now let's say we wanted a few foothills in there.
Maybe we'd use some Sap Green and some Van Dyke Brown together.
Get the yuckiest green color you can get out of this because you know how trees in the distance look real dark and kind of sappy.
That's why we call it Sap Green.
Okay.
And then mix some white with that.
All we're looking for here is a couple different values of green.
Real dark green.
And maybe just a drop of paint thinner.
Okay.
Just come up here with a brush and touch real lightly.
It doesn't take much pressure right here.
It's mostly just the shapes you're looking for.
And don't be afraid to run over the bottom of that mountain but I wouldn't recommend coming up too much higher than I did because you want to save just a little bit of that mist back in there.
It makes the mountain look more distant.
Okay and once you throw in a nice little hilly shape, you come back in with a clean dry one inch brush and lift that up.
And these will be your little trees in the distance.
I was just recently in Pennsylvania doing some classes and this is about all you see out there in Pennsylvania is these rolling hills.
It's a big change from Indiana.
Now down at the bottom of your foothill you'd want to mist it out by taking your big brush and use the tip of your big brush and smash in.
That's how you get that mist.
The reason I said use the tip of the brush is because when you use you the side you seem to get a straight line of mist across here instead of a variation.
So you got to be careful about little things like that.
And maybe I'd want to make some rows coming in front of that one.
So I'd just a little bit more of the brown and the Sap Green to that same color.
And say this one comes down in front of that one.
Just make it happen.
As long as you work from back to front, through the entire painting, you really can't go wrong.
But you'd never want to put in three or four foothills at a time and then go back because when you're blending the bottom of this one, you might come in and go "whoops" and hit the top of that one if you weren't real careful.
But we can fix anything so we're not really worried about it.
Okay.
Let's take a little bit of...real dark this time, just pure Sap Green and Van Dyke Brown.
And put one more row right in here making sure we save some of that mist though.
And notice how the incline of the land lessens as you come forward.
My mountain was real high and bold and that first row of foothills was kind of, kind of high and rolly.
And now this next row is just sort of flat.
That gives the illusion that this is real far away.
Just going through my same steps over and over again.
Notice when I'm making this mist I'm really pounding in hard.
You have to get tough with this brushes.
They're so big you have to convince them to do the right thing.
Okay, now maybe we'll go for a row of dark foliage up front.
Van Dyke Brown and Sap Green just like before.
That'll be our mother color for the rest of the painting.
We'll be using that to put our dark shadows in for everything.
Now what I'm doing is just pulling the brush through the paint and coming up and smashing it right in there.
So even if you've never painted before this is really simple to do because no matter which way you twist or turn the brush it's always going to come out looking good.
And kind of make this drop a little bit on the right hand side so it looks like a round lake up front.
And then I'll take my big brush.
Pull some reflections down.
Go across.
Let's see.
And now I'll throw some land in with Van Dyke Brown one more time on the knife.
First you just start off by touching real lightly and then you pull to the left hand side.
Kind of making little hills here too.
Real flat ones though.
And a little bit of brown and white for highlights.
You could even throw some Dark Sienna or something in there if you wanted to.
Bright Red works nice for that too.
And of course every time you have something above the water you have to pull a reflection out of it.
And go across that one also.
Now say I wanted to come in and put some colors on this foliage back here.
I'd probably use a little bit of green first because you do see a lot more green in nature than any other color.
So a little bit of Sap Green with Cadmium Yellow makes kind of a nice light green color, yellowish green.
And on this part you use lots of paint on the brush but barely touch to get that crystally effect.
And you can start changing your colors around.
You can use any of your three yellows.
And maybe as I get out to the corners I'd want a little bit more subdued colors.
So I'd start adding more green and more red.
That gives the impression the sunlight is shining right down in the center over there.
Now a little bit of liquid white on the knife and just kind of smear it in on the palette, like this.
And then wipe your knife off and cut right across that.
Just like that.
Trying to get a little bit just on the very blade, end of the blade.
And when you do that the roll of liquid white is going to look like it's on the top of your knife but it's actually right on the very end of it.
And that's about the only way I've found to get a good amount of paint on there.
And remember water lines have to be straight even when you're coming around a bend.
Still water always lies flat.
Okay.
Let's see, down here.
Let's use a little bit of Phthalo Blue and a little bit of Prussian Blue together.
See what kind of color we get out of that.
Now this is on the big brush and I'm just going to start out by coming up here and pulling out a big shape.
Pulling out one big, blue shape.
This will be the start of our waterfall.
Smooth this out and back a bit a little bit here.
Okay.
I'm going to use my fan brush with liquid white and Titanium White on it.
And just throw in about six separate strokes here.
Okay, this will be the first one.
And each individual one kind of overlaps the next, just a tiny bit.
And you do need to use plenty of liquid white for this.
It's kind of hard to get that paint to flow on there just right.
And it's really not a good idea to go back over your strokes again.
A little bit of movement in the water in back of it here.
Okay.
Now, since that waterfall is just kind of sitting out in the middle of nowhere let's bring in some cliffs from the sides.
Make it look like some banks got washed away.
You have to use plenty of Van Dyke Brown for this part right here and you kind of just smear it on, in sort of a C shape.
If you notice that I'm kind of making like a overhanging-cliff shape.
So you just fill that whole area in over there.
And then over here you do the same thing.
Make sure you cover up enough of the waterfall though - on the sides.
Okay and then some more Van Dyke Brown and white together for highlights on top of that.
Just like the dirt in the background.
And just grab on top of each shape and pull right across.
And automatically you've got the top of your cliff.
And you just kind of decide where you want them.
And then sometimes a neat effect is to take a clean knife and push up into it and pull down.
And that really starts making it look like a cliff.
Okay.
Now say we wanted a little foliage around these cliffs - that's easy enough.
We're just going to kind of smash it in there like we did before in the background.
Maybe a bush here.
Some grass down here.
You know, whatever.
Just whatever you see in your mind's eye.
That's the way you want to put it on the canvas.
Now I might need a bit of dark blue shadow down here too.
That way when I go in with my splashes and stuff we'll have some real dark underground there to look good.
And this is how you do those splashes.
You just run your fan brush through the white, hit it on your palette a couple times to open up those bristles, and then come right here and start firing it in.
Kind of make some sound effects while you're doing this too, some splashy sound effects.
That helps a lot.
Okay maybe I'll come back in here and highlight this foliage now.
Getting into some brighter colors up here in the foreground, you know, the sun's out real bright today and maybe it hit even harder up here in the front on the left hand side.
Putting in this foliage is probably the easiest part of this whole technique.
You just throw it right in there and leave enough dark shapes and it just comes out like you like it.
And maybe I'll show you how to do one big tree using that same bushy idea.
And we'll stick it right over here.
Now don't forget to leave some places for the birds to sit.
You've got to leave some open areas on your tree here.
And just bring that right down.
Maybe with a knife and some Van Dyke Brown, a little trunk.
Now you don't need to get real detailed on these trunks because most of it is going to be covered up anyway.
Just a little bit of that Van Dyke Brown and white again to highlight that.
And for some reason they always look better with some little sticks in there.
That goes for everywhere in your foliage and everything.
Okay and how about a nice bright color?
Some Cadmium Yellow and some Bright Red with it.
Makes a real nice orange.
You can certainly tell what season this is.
All these leaves changing colors.
And maybe a bush to cover up his feet.
And usually on this painting I like to put and island down here just to break things up a little bit.
Just on this one side.
And of course you need to bring a little bit of grass down on that too.
Well other than a couple more little grassy things, I think this one's about done.
Probably call that finished.
[Bob] Okay well you understand now why this young man is in such demand as a teacher and why I'm so proud of him.
He's a fantastic painter and once again I'm proud to call him my son.
And Steve thanks for being with us today.
[Steve] Thanks Dad.
[Bob] And we look forward to seeing you again.
Happy painting and God bless.
[announcer] To order a 256 page book of 60 Joy of Painting projects or Bob's detailed 3 hour workshop DVD Call 1-800-Bob-Ross or visit BobRoss.com [music] [music]


Support for PBS provided by:
Distributed nationally by American Public Television