The Best of the Joy of Painting with Bob Ross
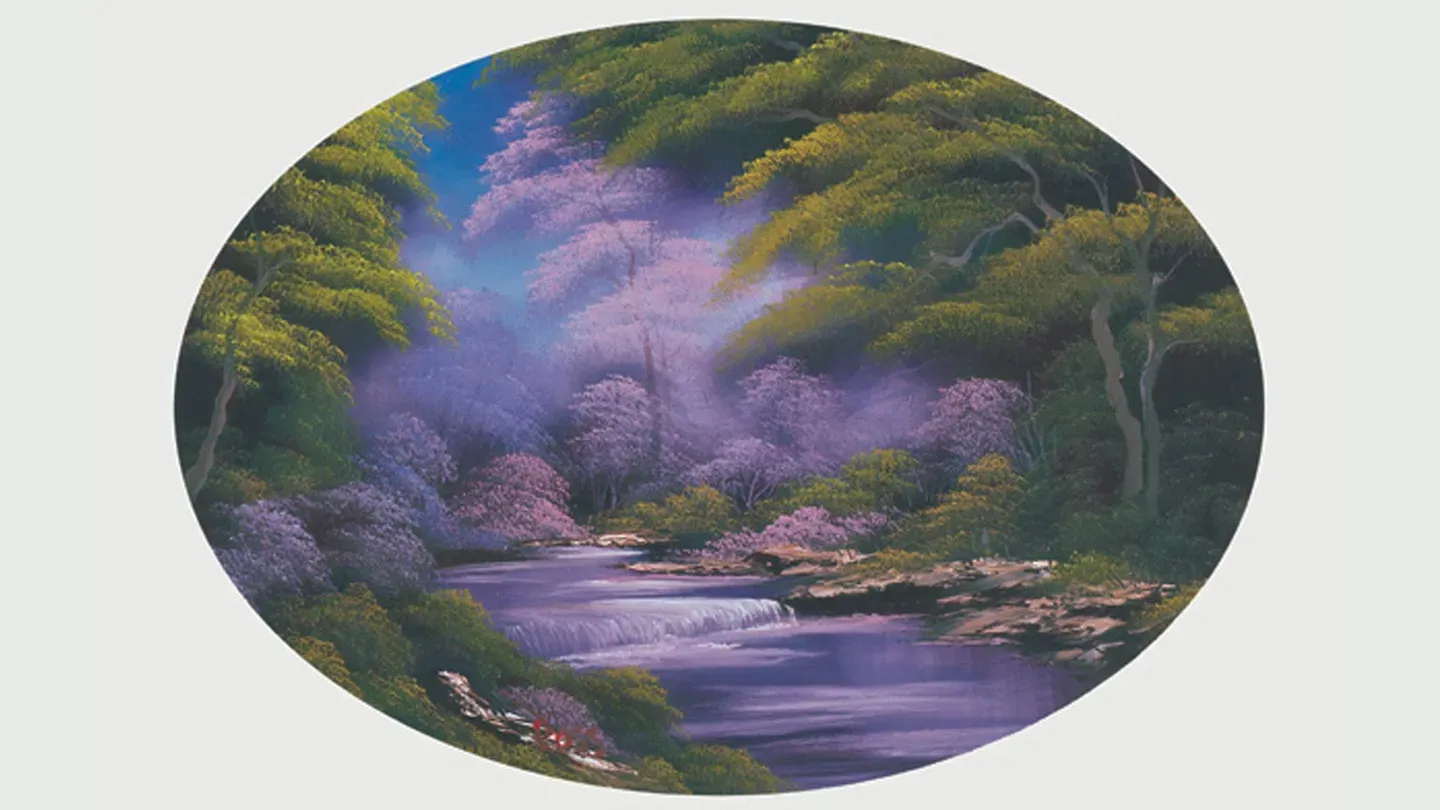
Wooded Stream Oval
Season 38 Episode 3812 | 27m 29sVideo has Closed Captions
Watch and learn as Bob Ross paints a novel twist in his beautiful wooded scene.
Watch, delight and learn as Bob Ross paints a novel twist in his beautiful wooded scene.
Problems with Closed Captions? Closed Captioning Feedback
Problems with Closed Captions? Closed Captioning Feedback
Distributed nationally by American Public Television
The Best of the Joy of Painting with Bob Ross
Wooded Stream Oval
Season 38 Episode 3812 | 27m 29sVideo has Closed Captions
Watch, delight and learn as Bob Ross paints a novel twist in his beautiful wooded scene.
Problems with Closed Captions? Closed Captioning Feedback
How to Watch The Best of the Joy of Painting with Bob Ross
The Best of the Joy of Painting with Bob Ross is available to stream on pbs.org and the free PBS App, available on iPhone, Apple TV, Android TV, Android smartphones, Amazon Fire TV, Amazon Fire Tablet, Roku, Samsung Smart TV, and Vizio.
Providing Support for PBS.org
Learn Moreabout PBS online sponsorship[Music] Hi, I'm certainly glad you could join us today.
I thought today we'd just do a lovely little painting since this is the last show of the 16th series.
So, tell you what, let's start out.
Have them run all the colors across the screen that you need to paint along with me.
While they're doing that, let me explain what I've got going up here.
Today I have a canvas, just regular old 18" by 24".
I put a contact paper oval on here.
Cut an oval out of contact paper.
I've taken black gesso, and just sort of painted a basic little shape like so around, and let that dry completely.
Then on top of that I've put transparent color.
And today I've made sort of a lavender color out of phthalo blue and alizarin crimson.
Covered the dark area.
And the white, that's just plain old liquid white.
So, tell you what, let's just do a fantastic little painting.
I'm going to start out today with just the least little amount of phthalo blue.
Just the tiniest little bit of phthalo blue on the old 2" brush.
Let's just put the indication up here, of just a beautiful little sky.
I just want a little bit of blue way back there.
Not much.
And just let it fade more and more as it works down here.
Right on down to virtually nothing.
There.
Very soft.
I want this to be a soft painting today.
Okay.
Now then we can wash that old brush.
And that's basically all that I'm looking for.
There we go.
Now, back to the [chuckles] brush.
That splashing's the most fun.
This is the brush that I used to put the dark color on.
It still has some of the dark color in the bristles.
And with that, I'm just going to begin tapping in some very basic shapes of some nice limbs that are hanging over here on trees, and just using the corner of the brush.
And just begin putting in all these basic shapes.
Allow it to pick up a little bit of the liquid white and work it back, just back and forth, forth and back.
There we are.
And maybe in here, you can, you can think up little individual tree shapes and bushes.
There we go.
And if you run out of paint, just reach down here and work back and forth and you can pick up a little bit more, keep right on going.
Maybe back here there's just the indication of a tree that lives way back here somewhere, nice size tree.
There.
All we're looking for is just very, very basic little shapes.
You can't hardly even see them at this point.
As I say, I would like to have this a very soft painting when we're done.
There we are.
Okay, now then.
Take the old liner brush.
Dip it into some paint thinner.
Some paint thinner and I'll go right into that same color that I put on the back, that lavender color.
It's phthalo blue, alizarin crimson.
Maybe I'll get just a touch more of the crimson.
There.
I want it a little bit more into the reddish hue.
There we are, alright, let's go up here.
Now then.
Maybe in here lives a nice little tree trunk.
Now if you have trouble making this flow all you need to do is add a little bit of paint thinner to your brush.
Just add a little paint thinner.
Now you just put some indications here and there.
Little sticks and twigs, all kinds of things that you'd see out in the woods.
This is where the little squirrel plays.
There.
Maybe in here there's a few little things.
You can just make all kinds of little indications.
Some of these we'll cover up, some we'll leave and people will think you worked for long, long periods of time to put all this much detail in your painting.
And we don't tell them any different.
That's our secret.
There we go.
I know years ago I had someone ask me, said, "Bob, how long's it take you to do a painting?"
And I said, "20 minutes, and 20 years."
It didn't make much sense at first, but I practiced for 20 years so I could do it in 20 minutes.
That's all.
Now then, back in here, let's start having some fun.
I'm going to take a little white, a little white, a little white.
Be right back.
Reach up here, grab a touch of the alizarin crimson, a little touch of the blue.
I want sort of a pinkish lavender color.
Whatever you want to call it.
A Mauve color.
Pretty color, that's all we care about.
There.
Now I'm going to tap the brush.
Give it a little forward umph when you do it.
That'll load paint right out on the tips of the bristles.
Alright, now maybe in our world, maybe back here in this little distant tree, there's the least little indication here of some beautiful little leaves.
Think about form and shape.
Use just the corner of the brush.
Just the corner of the brush.
Now if you have trouble making this stick, add the least little touch, least little touch, of paint thinner or even a little liquid white.
Liquid white will change the color a little, paint thinner will not.
Just dilutes it.
There we are.
See.
There he lives.
Just some soft, happy little things out here.
But think about shape and form, so, so important.
So, so important.
And we can sort of vary these colors.
I'll go into a little bit more of the phthalo blue.
A little more blue.
That's not quite enough.
I want a little more.
There we go, that's a little better.
I want this to almost blend right into the sky, it's so soft.
So very soft.
Quiet.
Happy little place.
Just all kinds of little trees, bushes, bunny rabbits hide back in here.
See.
There's another one, he lives right there.
But just the corner of the brush.
You can use a 2" brush, a 1" brush, on occasion I even use a fan brush to do this.
Just whatever.
But work in layers.
That's what's so very important.
If you don't work in layers, then it's going to look flat.
And we want depth and distance in here.
Little dark areas that you can look up in there and see between.
Okay.
I want to get crazy now, what the heck.
I want to add a little bit of sap green, and some yellow, a little yellow ochre.
Put some Indian yellow in here in a minute.
Maybe here and there a lives a beautiful little, ooh, isn't that pretty?
A little green bush right in here.
And we're just playing with color here.
And as I've mentioned before, when you buy your first tube of paint, you get an artist's license, so you can do anything that you want to do.
And a lot of times, people buy paintings more for color than for content.
So if you're ever out selling paintings, that's a good thing to remember.
Okay, a little bit more of my phthalo blue.
A little bit more of the alizarin crimson.
Just darkening that color up.
Same color, just making it a little bit darker.
Tap a little of that into the brush.
A little of that.
Mm, that's pretty.
Okay, now maybe right in here, ooh, that's a nice little bush.
Nice little bush.
Work on individuals, though, one at a time.
If necessary, give each one a name.
Make friends with it.
Whatever it takes.
But work it one at a time.
One at a time.
You get in a hurry, it start's feeling good, mm, and you take off and you knock out a whole bunch of them at once and they just sort of blend together.
One at a time.
That's most, most important.
That way you can put them in layers.
See, there's depth between these two.
And all those little sticks are hiding in those dark places.
That's what you're looking for.
That's what makes your painting special.
I have couple of brushes here that I'm sort of going back and forth with.
One of them has the greenish colors, the other one has the pinkish colors.
So I don't contaminate the two.
Ooh, that's a nice one.
Just the corner of the brush.
That's all we need.
And, and, get a little darker color.
As we get back in here, things are going to get darker, darker.
Not as much light playing back here.
Just little indications of a few things.
There.
That's where them little nighttime creatures sleep.
They come up here in the daytime, get out of the light.
Got a little condo back there.
Yeah.
Got the BMW parked in the garage.
Okay, a little bit on the other side.
Already it looks like we have a whole forest there.
Just layer after layer after layer.
There.
Now, maybe, maybe, maybe, maybe in our world, back here, maybe there's a little water back here.
You know me, I'm crazy about water.
I think it's just so beautiful in a painting.
So we'll just take a little titanium white on the 2" brush.
Now we've got to start making some big decisions.
Where does your water live?
Maybe in our world, let's say right about here.
Make a decision, touch, pull straight down.
Just pull it.
Because there's color on the canvas, that lavender color, it'll mix with the white and automatically these beautiful little things will just happen.
They'll just happen.
You don't have to worry about them, fight with them.
They're there.
Because you put that transparent color underneath.
One of the questions that I hear repeatedly is, "How do I tell if a color is transparent?"
Put it on a black canvas.
Just take a little on your finger, rub it on the black canvas.
If the canvas still looks black, then it's transparent enough for what we're doing.
Some colors are only semi-transparent, but they work for what we're doing.
Now, across, like so.
But if you put an opaque color on there, like bright red or white, you'll immediately, immediately, you'll know what I'm talking about because the canvas won't look black any more, it'll stand out.
That's not what you're looking for if you want a transparent color.
Let's take Van Dyke brown.
A little roll of paint on the knife.
Have to start deciding where our land lives back here.
Maybe, oh, there's another little projection.
See that happened just where the brush was at.
Then you come back and put a little dirt on there, make all kind of things.
Maybe there's, shoot, maybe there's all kind of little, there it is.
Just sort of look at your individual painting.
Don't just try to copy what somebody's done.
We don't try to teach you to copy here.
We want to show you how to do a technique and then turn you loose on the world.
Absolutely turn you loose, because then you can do anything that you want to do.
All you have to do is learn the basic technique.
And I think this little show will give you all that you need as far as technique goes.
There.
Pull it out, like so.
Cut across, and once again, our little roll of paint.
That's just dark sienna, a little white.
Come right across like so, barely touching.
Maybe I'll add a little more white to that, I want it a little brighter.
I want you to be able to see it a little better.
Sometimes when we're doing TV, we paint a little bit brighter than normal just so it shows up a little better.
When you do your painting, you make that big decision.
How do you want it to be?
Darker?
Lighter?
It's up to you.
Up to you.
Just barely grazing the canvas there.
Let these things just sort of bounce along.
Don't kill all the dark though.
Don't kill all the dark.
Starts feeling good, mm, and you just keep going and going and going and the next thing you know there's nothing left but highlight.
And you need the dark in order for your light to show.
Need that, you really need that.
Okay, now, let's go back to our little 1" brush here.
Maybe there's a happy little bush that lives right there.
Sort of projects down on the land.
Just wherever you want it.
There are all kinds of little things.
All kinds.
That just sort of brings it together and kills that straight edge that was right up there.
Sometimes, take a little dark, put underneath there, and it makes a whole new projection if you're making little stones and rocks.
And that's nice, that's nice.
Let's take a little bit of that lavender color on the knife.
Same old lavender color.
Here and there maybe just put the indication of a little, little water line.
Just sort of touch it.
Just nice colors.
You just can't help but liking colors like this.
And as I mentioned earlier, if you're out selling paintings, colors like this sell.
People are looking for happy colors to put in their house.
Take a little liquid white, a little titanium white, mix them together, reach up here, a little phthalo blue.
Let's have some fun back here.
Just take the fan brush and begin just putting in some little highlights on the water.
Don't want to kill all your reflections, because they'll show.
Let them show through these highlights that you're putting on there.
There we go.
Maybe the water's just coming along here and having a good time and all of a sudden [Bob makes "shooomp" sound] fell over.
Look at that, see?
Maybe there's just a tiny little happy little waterfall that lives right there.
It's not a very big one, it's just a tiny little splash down here where it hits.
But not too much.
We don't want this scene to get too violent.
This is a very peaceful, calm little thing.
So there we are, that's enough.
Something like that.
Alright.
There we go.
Just sort of work that brush back and forth.
But see these areas like right in here, leave those.
Don't try to cover them all up.
They're very, very pretty, and you can see those reflections we put in there, they're hiding in there.
Alright.
Now then, maybe over here on this side, let's just go back to our 2" brush.
This is the same color that I used and let's put a, maybe there's a happy little group of bushes that live right along here.
Wherever.
Make any shape that you want here.
Just make some little individual things, maybe it comes right on back up in here.
And that sort of brings it all together.
Just brings it together.
You have to decide how big your bush is here.
There he is.
Okay.
Now.
We've got our... there's our two brushes.
I have two brushes that I'm using to put these highlights on.
When you're painting at home, too, you'll also find that two brushes, a 1" and a 2", will save you a lot of time and a lot of brush cleaning.
Have one brush for lights, one for darks.
Pays tremendous dividends.
And if you're lazy like I am, you'll really understand.
There.
Okay.
Individuals, again, though.
One at a time.
Ooh, there's a nice one.
It looks like it's sort of just hanging over, like a big, whew, big fern there or something.
[chuckles] That's one of those happy accidents we talk about all the time.
They just sort of happen.
And when they happen, learn to live with them.
Sometimes when a happy accident happens, you jump in there and tear it up before you think.
Look at it before you do.
I'm just using the cad yellow, yellow ochre, a little sap green, a little Indian yellow, a touch of bright red here and there.
Just want to put the indication of another little bush right there.
Like so.
Maybe he's got a friend.
Lives right there.
Still working in layers.
I know you get tired of hearing me say that, but it's so important.
So very important.
Okay.
Maybe right out here, ooh, right over the water.
Isn't that pretty?
There he is.
Okay.
Go to my other brush.
Maybe right in here somewhere, ooh, there's a nice lavender one.
Just sort of back and forth, however you want them.
There.
Maybe.
Maybe in our world, put a little brown right here, maybe there's a happy little stone here.
We don't know.
Just add where you want it.
Drop it in.
Take a little highlight color, just let it touch, bounce, barely touching, just let it sort of bounce right along there.
Brighten it up a little bit more.
Ooh.
There, there.
Whew.
Isn't that pretty?
And you can do it, I know you can do it.
I know you can do it.
Every day I see evidence that people can do this.
Literally thousands of people have picked up brushes and tried.
That's all it takes.
You can do anything that you believe you can do.
And if I know you can do it, you certainly believe you can do it.
Because I wouldn't lie to you.
There.
There we go.
It's always sad for me to come to the last show of a series, but we're already under production for the next series.
It's over 200 shows now.
If you haven't got to see all of them in your area, give your station a call, tell them you'd like to see them.
That's the only way they know.
And, shoot, if they want to see them, we'll get them to them.
Okay, maybe up in here, let's have some nice trees.
Take some, we'll take some paint thinner, Van Dyke brown, I'll be right back, reach down here and get a little white.
Whew, ooh, that's nice.
Maybe a little dark sienna in there too.
Let me get a little more thinner.
Be right back.
Oh, there's what we're looking for.
Look how thin that is.
See it run?
That's the secret.
That's the secret.
Okay, maybe we want some nice tree trunks up in here.
Touch, and as you work down here let the brush turn and wiggle and jiggle.
Let it have fun.
Let it have fun.
There.
There we go.
Maybe it's got a friend right there.
Mm.
Okay.
Now when you're doing this, if you have trouble making it stick, add a little paint thinner to it.
Just means it's, if it doesn't flow, just mean's it's not quite thin enough to flow right over there.
And the paint we use, I say it over and over only in case somebody has just tuned in, is very thick, it's very dry, very firm.
Except the highlight colors, now.
The yellows are manufactured to a thinner consistency.
But these base colors, especially the dark colors, have to be extremely firm, dry, and thick.
Otherwise if you have two thin little skinny paints and you try to paint one over top of the other you're going to be a mud mixer and you're going to talk bad about me.
And I want it to work for you.
A good test.
Take your paint, take the top off of it, give it a squeeze.
Paint should stand about 3/4" or so above the tube, by itself.
If it'll do that, then it's probably probably firm enough for what we're doing.
Try a little bit on the other side here.
Maybe there's an old tree lives over here too.
We got this nice dark area.
There we are.
Just put it in.
Put it in there.
A little touch, make that trunk a little bigger.
Now then.
It's time to come up here and begin putting some highlights on these old big trees.
We'll just use, we'll use some of this green color, what the heck.
Maybe when you do yours you want those to be lavender.
Or pink.
Or blue.
Whatever.
Tap a little color.
Push that brush so you get that color right out on the tip.
Now, have to make big decisions here.
Where does your leaves live up here?
Using just the corner of the brush, just the corner.
And once again, worry about patterns and shapes.
Don't just throw it on.
There we go.
I know sometimes when you watch the shows here it looks like we just run up here and sock it on and it just falls off any old where.
Take your time though.
We have to do that because we have time restraints.
You don't.
Enjoy.
Enjoy.
The whole object of painting is to make you happy.
We hope that it also brings an awareness of nature, and all of God's little creatures.
That you begin to see things.
That you look around and you see color, and you see form, you see shape.
You see all the beauty that surrounds you all the time.
So often, so often we look all of our lives but we don't see anything, and painting will teach you to see.
I've had people write and say, "There's been a tree living in my front yard for 20 years, and I never saw it, I never saw it, until I listened to you and I understood color and form and shape and I looked out there and the tree said good morning to me today.
And it's been there all this time."
And if we can awaken an awareness in you of God's creations, then we've done a good job here.
There.
Let's go on the other side.
Maybe it's right there, see?
Just touch, let it go.
Wherever you want.
Wherever.
Beautiful, beautiful.
This is such a nice little painting.
And if you've never painted before this is one you might want to try.
Because it's easy enough that you can do it on the first shot, and it works, and you'll amaze your family, and your friends.
[chuckles] They won't believe you done it, they'll think you went out and bought it.
So, then's when you paint for them.
Set your canvas up and show them how to do it.
And when you find something good, spread it around.
Show others how to do it.
Shoot.
That's where half the fun of painting is, is sharing it with other people.
Just sharing it.
Now, I'm going to take a little bit of the very light lavender color, some paint thinner.
Let's go up here.
Maybe here and there we can, back in here, we can see a little light stick and a twig.
Just wherever you want them.
There we go.
There's just little things living back in here.
All the little doers that live back in the woods.
Okay, take a clean knife, scrape in a stick or two here.
All we're doing is allowing some of that black to show through.
Makes it look like hundreds of little sticks.
People think you worked yourself half to death.
And we won't tell them.
That's our secret.
Yours and mine.
Let's bring the camera up here, take this oval off.
I think we have a pretty painting, so let's see.
Look at that.
[Bob makes "zoop" sound] Isn't that fantastic?
This is one of the nicest, most interesting little scenes to do.
I'm going to take a little of the bright red, a little paint thinner.
I think we'll sign this one, call it finished.
I really hope you've enjoyed it.
These little paintings will make you happy.
They're quite easy to do.
They'll bring a lot of richness to your life.
And as I mentioned earlier, this is our last show of the 16th series.
I've enjoyed being with you.
You're very, very special to me, and I want to wish you the very best that life has to offer.
I'll see you in the next series, and until then, happy painting, God bless, and take care of yourself, my friend.
[announcer] To order a 256 page book of 60 Joy of Painting projects or Bob's detailed 3 hour workshop DVD Call 1-800-Bob-Ross or visit BobRoss.com [music] [music]


Support for PBS provided by:
Distributed nationally by American Public Television